CEN3031 is the "Introduction to Software Engineering" class at the University of Florida. Some professors require students to contribute to open source projects as part of their coursework, (oftentimes) including projects maintained by the UF Open Source Club (OSC). This guide is a high-level overview of the open source contribution workflow, including how to contribute to OSC as a CEN3031 student. Please note, expectations may vary across semesters, so please consult your course material to determine whether contributions to the club are allowed.
If you're interested in software development or open-source work, consider joining the Open Source Club. Collaborating on projects can enhance your portfolio and improve your chances when applying for internships. Leadership roles, such as tech lead or executive board member, are also available for those wishing to strengthen their resume. Effectively, the club serves as a "third-place" for fostering a tight-knit community centered around technology. Members are invited to hang out, find friend groups with similar interests, and work on open-source projects together. We host weekly "casual coding" sessions for collaboration, along with workshops and hackathons featuring industry professionals and former interns. For updates on meetings and coding sessions, please join our Discord channel.
If you have any questions or need additional assistance, don't hesitate to reach out via Discord or our contact form.
Table of Contents
- Open Source Projects on GitHub
- GitHub Issues: Opportunities for Contribution
- Beginners Guide to Git & GitHub
Open Source Projects on GitHub
Contributions to the open source club are organized through GitHub. GitHub is a platform for version control and collaborative software development that uses Git to track changes in code, allowing multiple developers to work on the same project simultaneously. To use GitHub, you'll need to familiarize yourself with Git - please refer to the final section of this article for a brief introduction.
Every semester, Open Source club members propose and vote on new projects. The most voted-for ideas are taken up by tech-leads, which set up a GitHub repository, organize members, and delegate tasks. Contributing to open source projects is a great way to improve your CV as a University of Florida student. Currently, the following OSC open source projects are open to contributions:
- Echo Chat App: a peer-to-peer (P2P) mobile app for talking to students within a radius around you. Built with NodeJS (TypeScript) and React Native.
- Jukebox: A NodeJS (TypeScript) full-stack that integrates with the Spotify API, allowing users to add and play songs through a collaborative queue.
- Bytes of Love: A visual novel video game in RenPy Python. Players learn about different programming languages through an interactive dating simulator.
- Bytes of Love website: website for the Bytes of Love game.
- Alarm Clock: Alarm clock with configurable punishments for not waking up. Built with NodeJS (TypeScript) and Expo Go.
GitHub Issues: Opportunities for Contribution
At the open source club, we publish tasks to be completed as GitHub issues. GitHub Issues are a feature that helps track tasks, bugs, feature requests, and discussions within a project. They allow developers to organize and prioritize work, facilitate communication, and plan project milestones effectively.
This page will be actively updated to reflect new issues. To contribute, please post a reply asking to be assigned to the issue. If an issue is insufficiently explained or you need help, PLEASE ASK!!! Issues are assigned on a first-come-first-serve basis:
-
Echo Chat App:
-
Jukebox:
-
Bytes of Love:
-
Bytes of Love Website:
-
Alarm Clock:
If none of these issues interest you, we recommend joining our Discord and getting in touch with the tech leads within the project channels. They may be looking for help with tasks that have not yet been posted as issues.
Beginners Guide to Git & GitHub
This guide is an adaptation of a previous blog post. To read the original, click here. We also have detailed beginner's guides for Python, Rust, JavaScript, and HTML/CSS.
Installing Git
Git can be installed via its installer here. Alternatively, Mac0S and Linux users can install git via Homebrew or via their respective linux package manager (see instructions).
Contributing to a project
Recommended Workflow
- (Optional) Fork a repository
- Clone repository
- Navigate to repository files via your command line.
- Create a branch.
- Navigate to branch.
- Make & commit changes
- Push changes
- Repeat steps 6-7 as many times as necessary
- Open a github pull request
Navigating Github (steps 1-3)
Forking a repository:
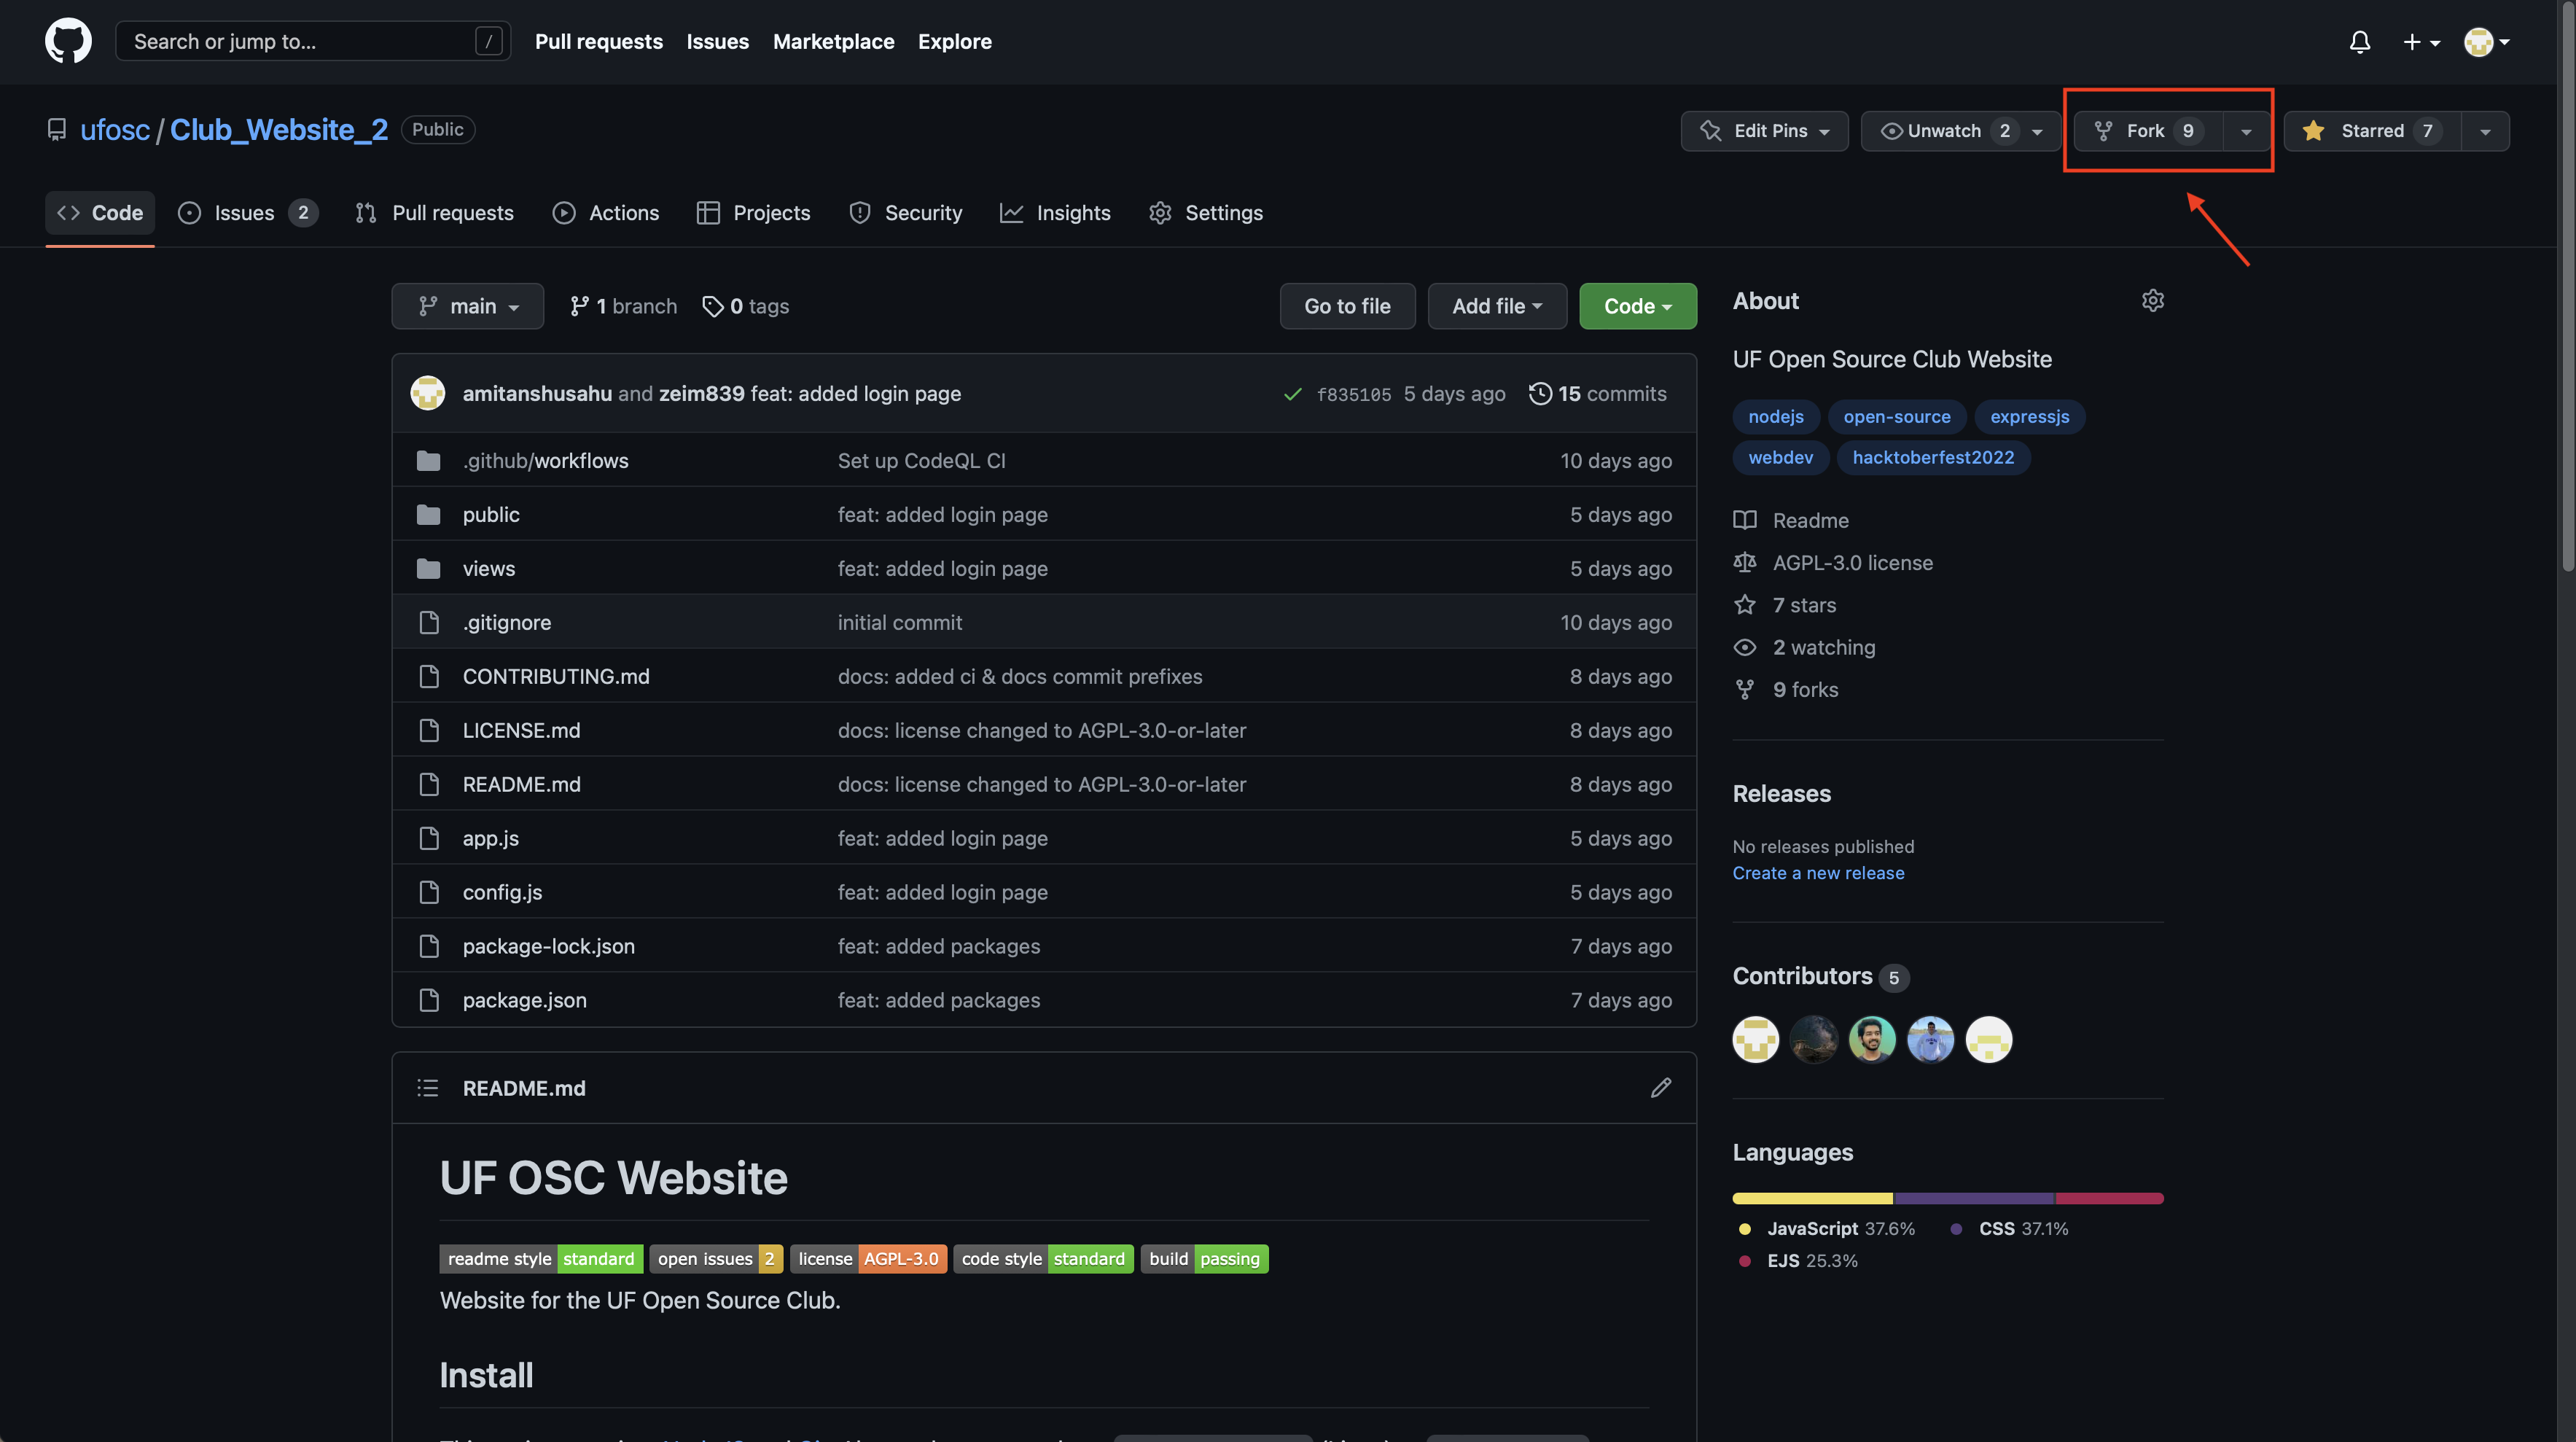
If you're working on your own repository or have explicit permission to modify the source repository, then you can skip this step. Otherwise, forking will allow you to create branches and push changes to a personal copy before you can open a pull request (you most likely wont be able to do directly on the original repo without special permissions).

Cloning a repository:
If you've just forked a repo, make sure you are cloning your fork and not the original. Github should redirect you automatically; if it doesn't, you can navigate to your Profile>Repositories and select the fork from there.
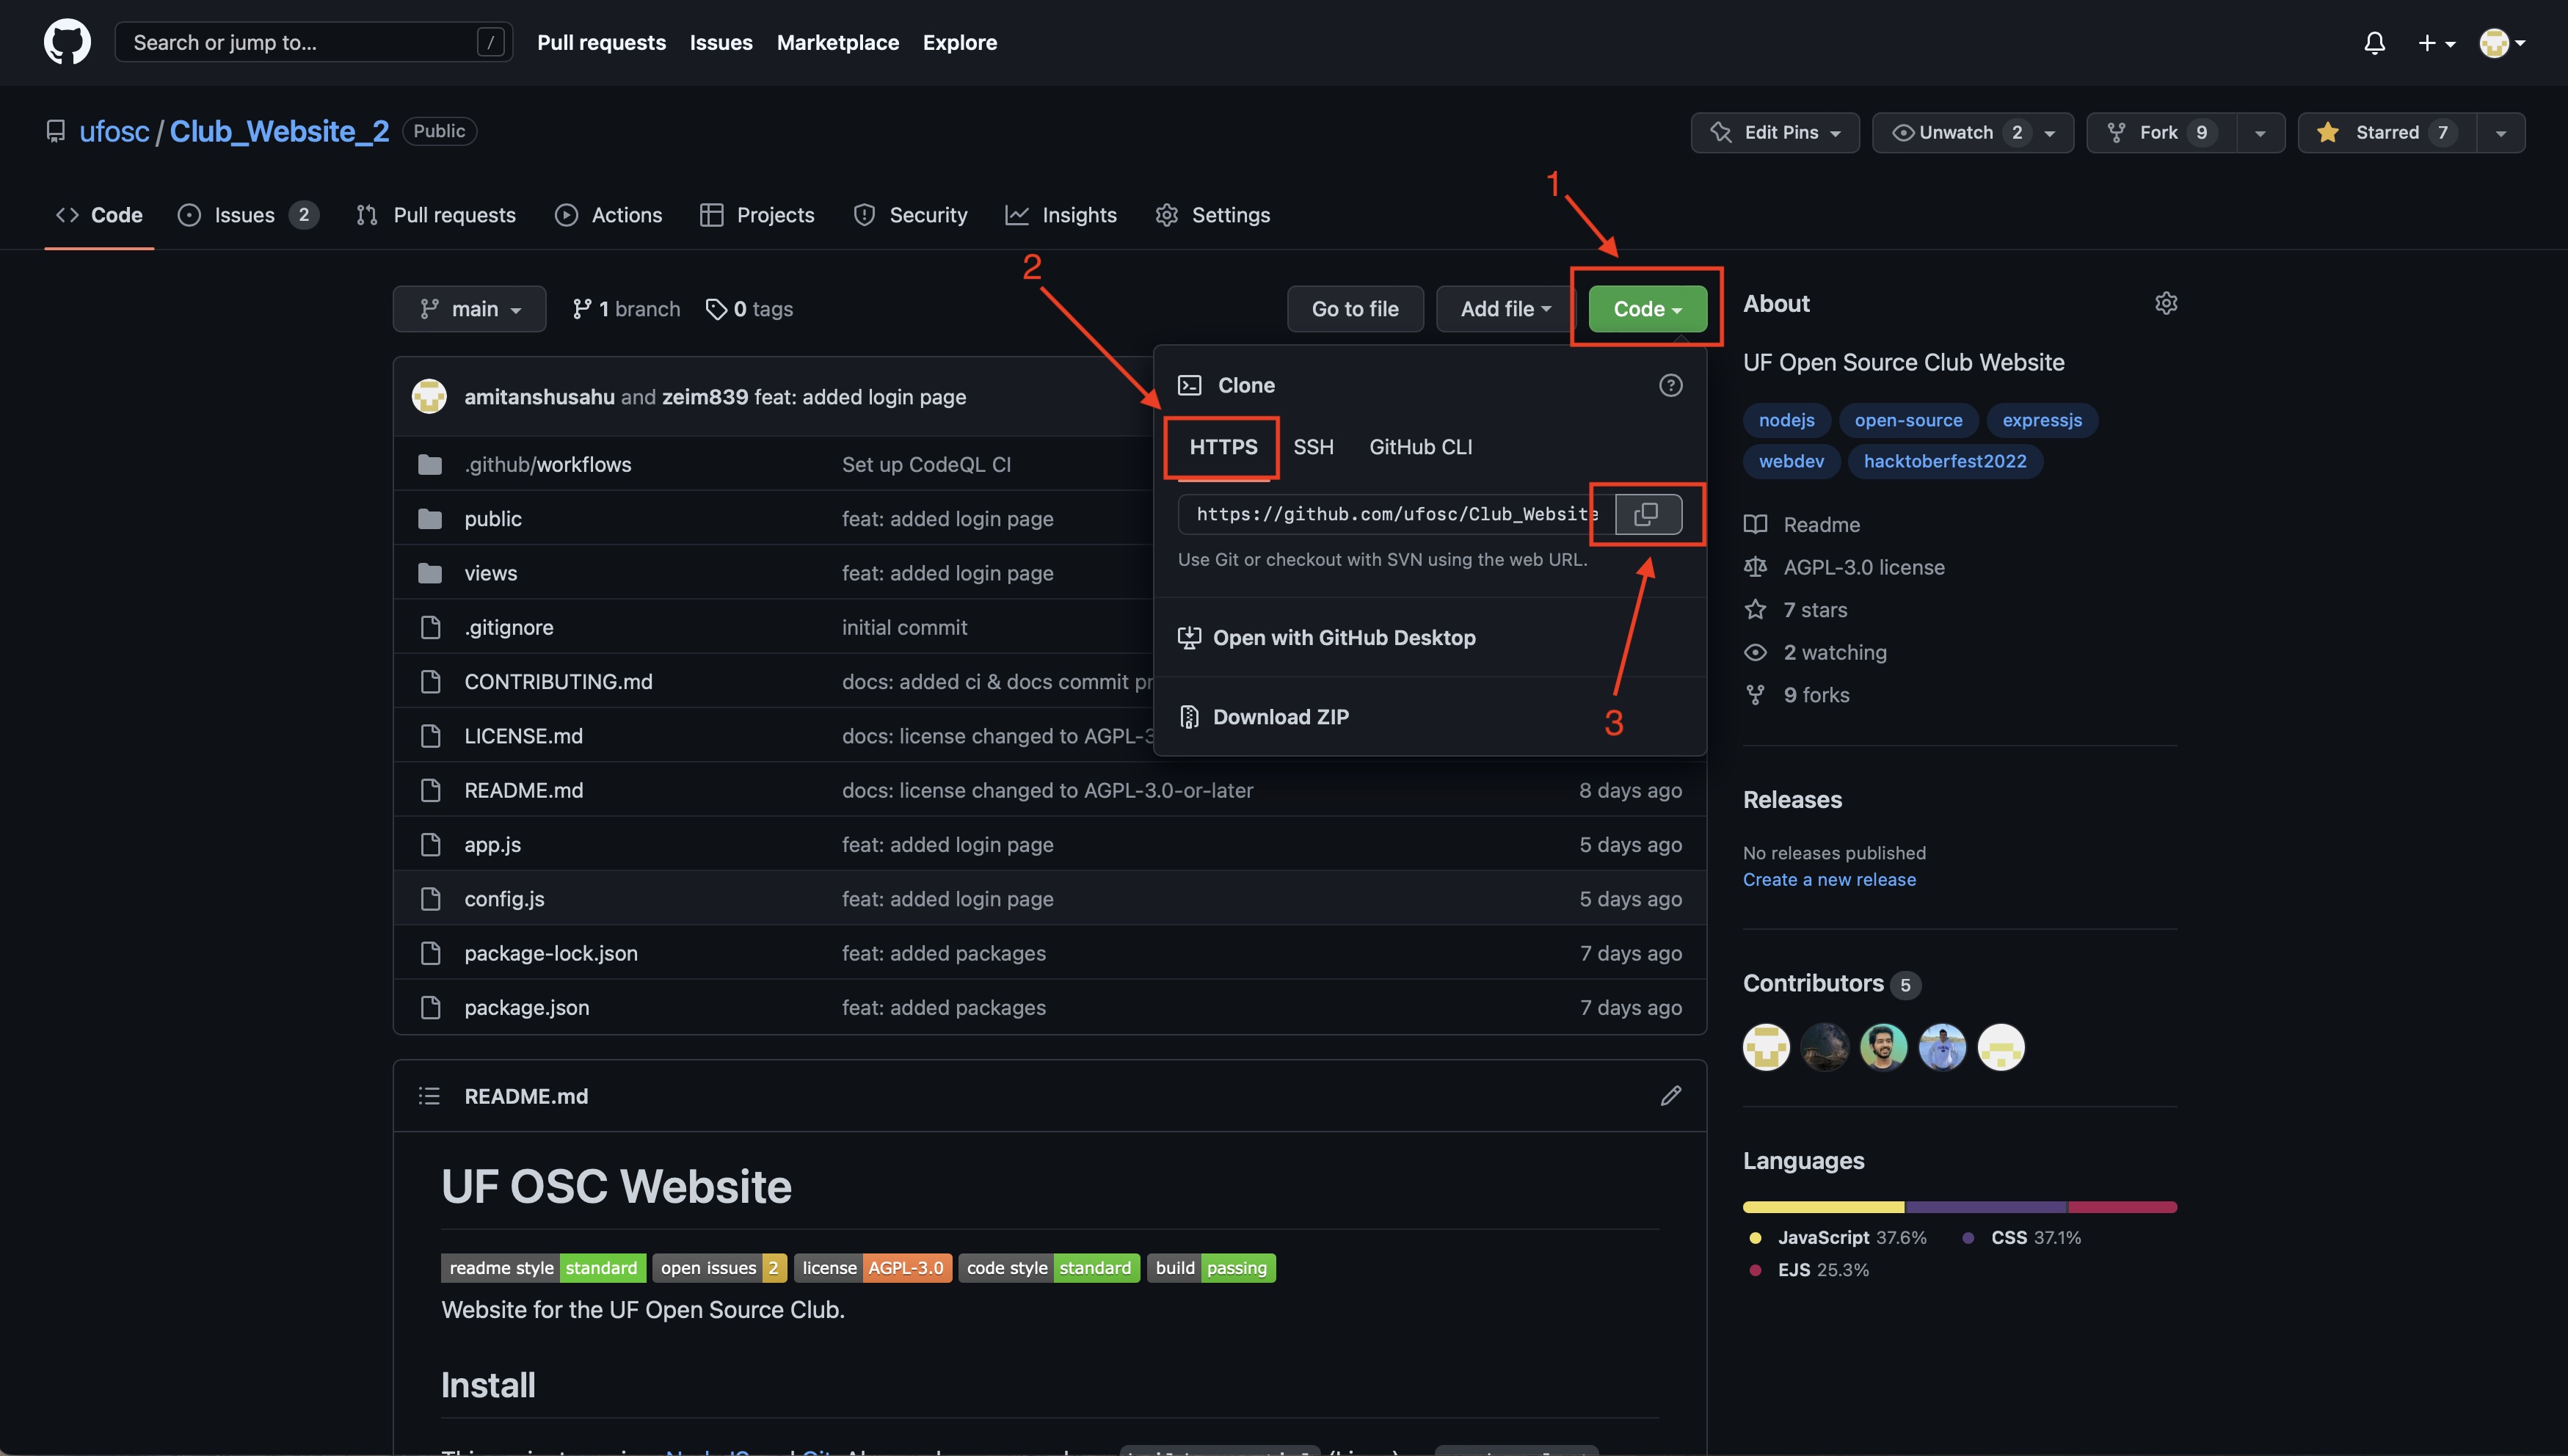
To clone, click on the Code button and copy the HTTPS source:

Then, open up your terminal and type:
cd [desktop/downloads, wherever you want to copy to]
git clone [source you've just copied]
cd [Name of your project]
git clone will copy the project onto your desired directory, whilst cd will allow you to navigate between directories. At this point, you should be in your project's main folder. To show a list of all available files, you can run:
lsContributing with the command line (steps 4-8)
The following steps walk you through the contribution workflow via the command line (terminal).
Fetching & pulling
If you've just cloned a repository then there's (probably) no need to do this. However, you'll want to run these commands before you start working on new contributions to make sure your main branch is up-to-date with your source - you don't want to start making changes to an old version of the codebase.
First of all, make sure you're on the main branch:
git checkout mainThen, fetch:
git fetchFetching will ping the github server and download new changes. However, Git doesn't automatically apply these changes (in case you're still working on something).
If you've made any uncommitted changes, you should save them before pulling. Pulling might also give you an error if you have uncommited changes - even if you dont want to keep them. You can resolve these errors (and save your uncommited work) by running:
git stashThen, load the new changes with pull:
git pullIf at this point you want to discard your old uncommited changes, then skip the following step. Otherwise, you can restore your changes with:
git stash popIf you ever want to see an organized list of all your changes and staged work, you can run:
git statusThis will also show you the uncommitted work you may (or may not) want to save before pulling.
Creating a branch
Branching allows you to maintain an isolated copy of the codebase for you to implement new features in. Once you've made sure you're on main (git checkout main), you can create a new branch with:
git branch [your_branch_name]At this point, you're still on main, so you want to navigate to your new branch with:
git checkout [your_branch_name]Making and committing changes
Commits are the changes that you're "committed" to, meaning you are certain about wanting to keep and push them to the original source of your project. Once you are done working on your code, you can view all your changes with:
git statusThis will show you a list of staged, uncommited and untracked files. New files are always untracked because git has never heard of them before - you'll want to treat these the same as uncommitted changes. Uncommited changes are changes made to files that git knows about, but haven't yet been committed. Finally, staged changes are the changes that will be saved to a commit once you commit your work.
Your goal is to move all the changes you are happy with to the 'staged' portion in git status. Before doing this, make sure to review all your uncommited and untracked changes and decide which of those you want to keep or discard.
Then, begin staging your desired changes with:
git add [file_name]You can add multiple files at once with:
git add [file_name] [file_name2] [file_name3] ...Once youre ready, you can commit (i.e. "finalize/save") these changes using:
git commit -m "enter a message describing your changes"You dont have to add all your changes into a single commit - and its probably best if you dont. You can repeat these steps as many times as you want: making changes, staging, and committing as many times as necessary. Its always a good idea to separate your work into multiple commits, just make sure to use descriptive and detailed messages.
Once you've made your changes, you can sync with github using:
git push origin [name of your current branch]If you open up your fork page on github, you'll probably see a message alerting you of these new changes. These are not final yet, you'll need to merge your fork before they'll appear on the main branch (more on that later).
Though you can technically push as often and as many times as you want, it's probably a good idea to wait until you're all done with your work. In the event that you want to remove or backtrack one of your commits, it'll be easier to do so when they haven't yet been synced with github.
Keeping your fork up to date
You'll want to stay up to date with new changes so that you're always starting your work on the latest version of the codebase. To do this, you'll need to regularly sync your fork. An option should appear on your fork's page to sync with original repo. You'll need to sync it regularly and then update the copy on your laptop with:
(make sure you're on main):
git checkout mainDownload changes:
git fetchLoad changes:
git pullRead More

Fall 2024: First GBM
Michail Zeipekki
September 3rd, 5:00-7:00PM, CSE A101
August 31, 2024
